Deploy your app to the cloud
Contents
It’s time for the final act - sign up for a free account and deploy your app on a live server.
Public API
So far, you’ve been playing with the API via Content Studio. If you want to access the API endpoint directly on your sandbox, it’s available at:
-
http://localhost:8080/site/intro/draft (draft items)
-
http://localhost:8080/site/intro/master (published items)
In the following steps, you will deploy the API to a live URL. Remember, the GraphQL API is accessed via HTTP POST method, as such - visiting via a regular browser will give you a 404 error.
| The Chrome extension Altair lets you browse any GraphQL API simply by pointing it to the API URL. |
Sign up
To complete this step, you’ll need Enonic XP running on a server. To get the job done, we’ll use Enonic’s free hosting tier:
|
If you are looking for other hosting options, Enonic XP is open source, and can be deployed pretty much anywhere. |
-
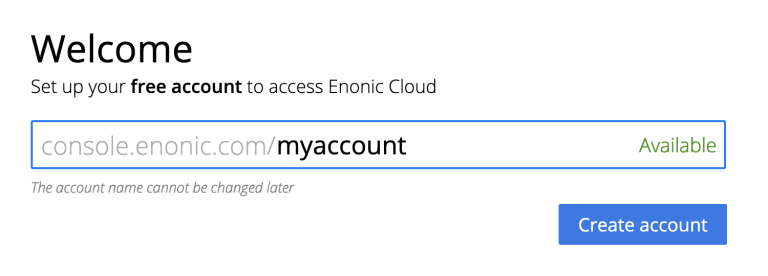
Visit our sign up to claim your forever-free account.
-
After signing up, complete the verification of your e-mail before you can move to the next step.
-
Log in to the Enonic Console and choose your account name.
Create solution
-
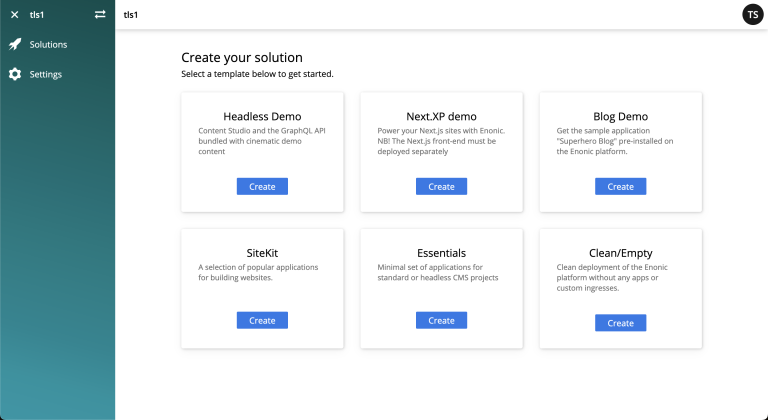
then create a new solution from the menu:
Solutions → Essentials → Create. Complete the solution wizard steps using your personal preferences.
We will then spin up an Enonic XP environment, similar to your local sandbox, but this time on a real server in the Cloud.
Deploy application
-
Once the solution has started (verify by logging in to the XP admin), you need to authorize the CLI. Run this command:
enonic cloud login
-
After successful authentication install your app using this command:
enonic cloud app install
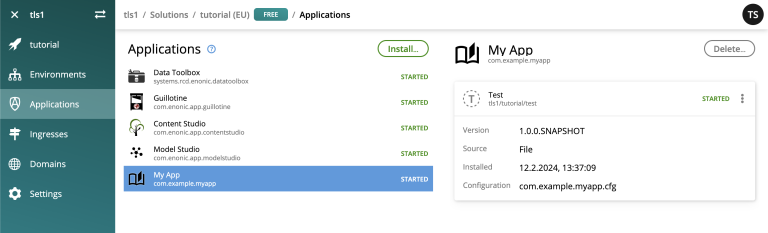
You must execute this command from your app folder. Alternatively, upload the app from the Console directly: Solutions → <Your solution> → Applications → Install. The app file can be found in your project folder i.e.build/libs/myapp.jar.
Once installed, the app should be listed in the Cloud console:
Expose the API
Finally, you may also want to expose the API:
-
create an ingress in the Enonic Cloud console:
Solutions → <Your solution> → Ingresses → Create. Give it a suitable name i.e.Intro API, and use the following values:- Environment
-
Use the default value
- Target
-
/site/intro - Domain
-
Use the default value
- Path
-
/api - ID provider
-
leave empty
-
Once the ingress is created, Select it in the list. This will reveal a link to your API on the right. hand side
-
Visit the URL to see the
Query PlaygroundAPI browser.The API browser can be disabled by changing the configuration of the Guillotine app.To use the published content API directly from a GraphQL client, append
/masterto the Ingress URL.Remember, the GraphQL API only accepts POSTrequests, so the browser will only show a 404 at this point.
Dive deeper
🎉 Awesome! You made it to the end.
In the process, you created an Enonic XP sandbox, built and customized your own app, ran GraphQL queries, got to know the Enonic CLI and our SaaS service.
As you may already imagine, the Platform is capable of so much more. Did you know that Enonic has a JavaScript framework, complete with TypeScript definitions the entire platform API? You may use it in your apps to extend and customize the Platform as you like.
To continue the journey, we recommend visiting the Enonic tutorials section of the Developer Portal.
Bon voyage!