Rendering based on Content Type
Contents
In this chapter you will create a new component that renders persons
Person content type
The Headless Movie DB contains both sample content, content type definitions. Person or more specifically com.enonic.app.hmdb:person, is one of these.
From Content Studio, you may easily find and list persons. Click a person, and then selecting the JSON preview, which allows you to study the properties of a person:
{
    "_id": "3a7b833f-3c37-4d55-88ae-cea21c556c68",
    "_name": "brad-pittless",
    "_path": "/hmdb/persons/brad-pittless",
    "creator": "user:system:su",
    "modifier": "user:system:su",
    "createdTime": "2018-07-03T06:47:46.379Z",
    "modifiedTime": "2018-07-03T06:50:07.268Z",
    "owner": "user:system:su",
    "type": "com.enonic.app.hmdb:person",
    "displayName": "Brad Pittless",
    "language": "en",
    "valid": true,
    "childOrder": "modifiedtime DESC",
    "data": {
        "photos": "c4b38a24-7857-4a56-bf92-a6bc17369a15",
        "bio": "Brad Pittless is a Golden Pump-winner whose memorable role as Tyler Daydern in Inflation Club (1999) cemented his place among Headless Hollywood's most magnetic leading balloons.",
        "dateofbirth": "1963-12-18"
    },
    "x": {
        "com-enonic-app-hmdb": {
            "SoMe": {
                "imdb": "https://www.imdb.com/name/nm0000093/"
            }
        }
    },
    "page": {},
    "validationErrors": [],
    "attachments": {},
    "publish": {
        "from": "2026-07-23T06:14:12.822Z",
        "first": "2026-05-05T12:36:16.195Z",
        "time": "2026-07-23T06:14:14.172Z"
    },
    "workflow": {
        "state": "READY"
    }
}
Person React component
To implement the rendering we need to create a new React component, and related data processor:
-
Create a data processor:
/src/main/resources/react4xp/components/content/PersonProcessor.tsimport {get as getContentByKey} from '/lib/xp/content'; import {imageUrl} from '/lib/xp/portal'; import {toArray} from "/react4xp/utils/arrayUtils"; import {PageDescriptor} from '@enonic-types/core'; import type {Content} from '@enonic-types/lib-content'; import type {ComponentProcessor} from '@enonic-types/lib-react4xp/DataFetcher'; function fetchAdditionalPhotos(photosIds) { return photosIds.map(photoId => { if (photoId) { const photoContent = getContentByKey<Content>({key: photoId}); return { _id: photoContent._id, title: photoContent.displayName, imageUrl: imageUrl({id: photoContent._id, scale: 'block(175, 175)'}) }; } }); } export const personProcessor: ComponentProcessor<PageDescriptor> = (params) => { const photos: string[] = toArray<string>(params.content.data.photos as string | string[]) const firstPhotoId = photos[0] || ''; const remainingPhotoIds = photos.slice(1); let firstPhoto = null; if (firstPhotoId) { const {_id, displayName} = getContentByKey<Content>({key: firstPhotoId}); firstPhoto = { _id, title: displayName, imageUrl: imageUrl({id: _id, scale: 'block(1200, 675)'}) } } const extraPhotos = fetchAdditionalPhotos(remainingPhotoIds); return { displayName: `${params.content.displayName}`, photo: firstPhoto, birthDate: params.content.data.dateofbirth, restPhotos: extraPhotos }; }; -
Add it to the dataFetcher, using the following two lines:
dataFetcherimport {personProcessor} from './components/content/PersonProcessor'; dataFetcher.addContentType('com.enonic.app.hmdb:person', {processor: personProcessor}); -
Create the Person component, it consists of two files:
/src/main/resources/react4xp/components/content/Person.tsx (React component)import {type ComponentProps} from '@enonic/react-components'; import React from 'react' import styles from './Person.module.css'; export const Person = (props: ComponentProps) => { const {meta, common, component} = props; const {displayName, photo, restPhotos, birthDate} = props.data as any; return ( <div className={styles.person}> <h1>{displayName}</h1> <p>{birthDate}</p> <div> { photo ? ( <> <div className={styles.photos}> <img src={photo.imageUrl} title={photo.title} alt={photo.title} height={675} width={1200} loading="eager" /> </div> </> ) : ( <p>No photo available</p> ) } {restPhotos && restPhotos.length > 0 && ( <> <h2>Photos</h2> <div className={styles.photoContainer}> <div className={styles.photoGrid}> <div className={styles.photoScroll}> {restPhotos.map((photo, index) => ( <img key={index} src={photo.imageUrl} title={photo.title} alt={photo.title} height={175} width={175} /> ))} </div> </div> </div> </> )} </div> </div> ) }/src/main/resources/react4xp/components/content/Person.module.css (CSS module).person .bio { font-family: sans-serif; } .person { display: flex; flex-direction: column; margin-inline: auto; } .person h1 { margin-bottom: 0; } .person p { margin-top: 0; } .flexBlock { display: flex; justify-content: space-between; } .photoContainer { position: relative; display: flex; ::-webkit-scrollbar { -webkit-appearance: none; height: 6px; } ::-webkit-scrollbar-thumb { border-radius: 8px; background-color: ghostwhite; } } .photoGrid { overflow-x: auto; } .photoScroll { display: flex; gap: 25px; white-space: nowrap; padding: 0; margin: .5rem 0 .5rem 0; } .photoScroll img { border-radius: 5px; } .photos { margin-block: 1rem; grid-template-columns: repeat(auto-fit, minmax(200px, 1fr)); grid-gap: 50px; gap: 50px; } .restPhotosContainer { padding: 1rem 0; max-width: calc(90vw - 1rem); } .restPhotos { display: grid; grid-template-columns: repeat(auto-fill, minmax(15%, 1fr)); gap: 5%; margin-block: 1rem; } .photos img { width: 100%; height: auto; border-radius: 8px; } .restImg { width: 100%; aspect-ratio: 1 / 1; object-fit: cover; object-position: 50% 50%; border-radius: 5px; } .richText { font-size: 24px; } .richText figure img { border-radius: 5px; } .photosHeader { margin-top: 0; color: #EF82F0; } -
Add it to the componentRegistry: with these two lines:
import {Person} from './components/content/Person';

componentRegistry.addContentType('com.enonic.app.hmdb:person', {View: Person});
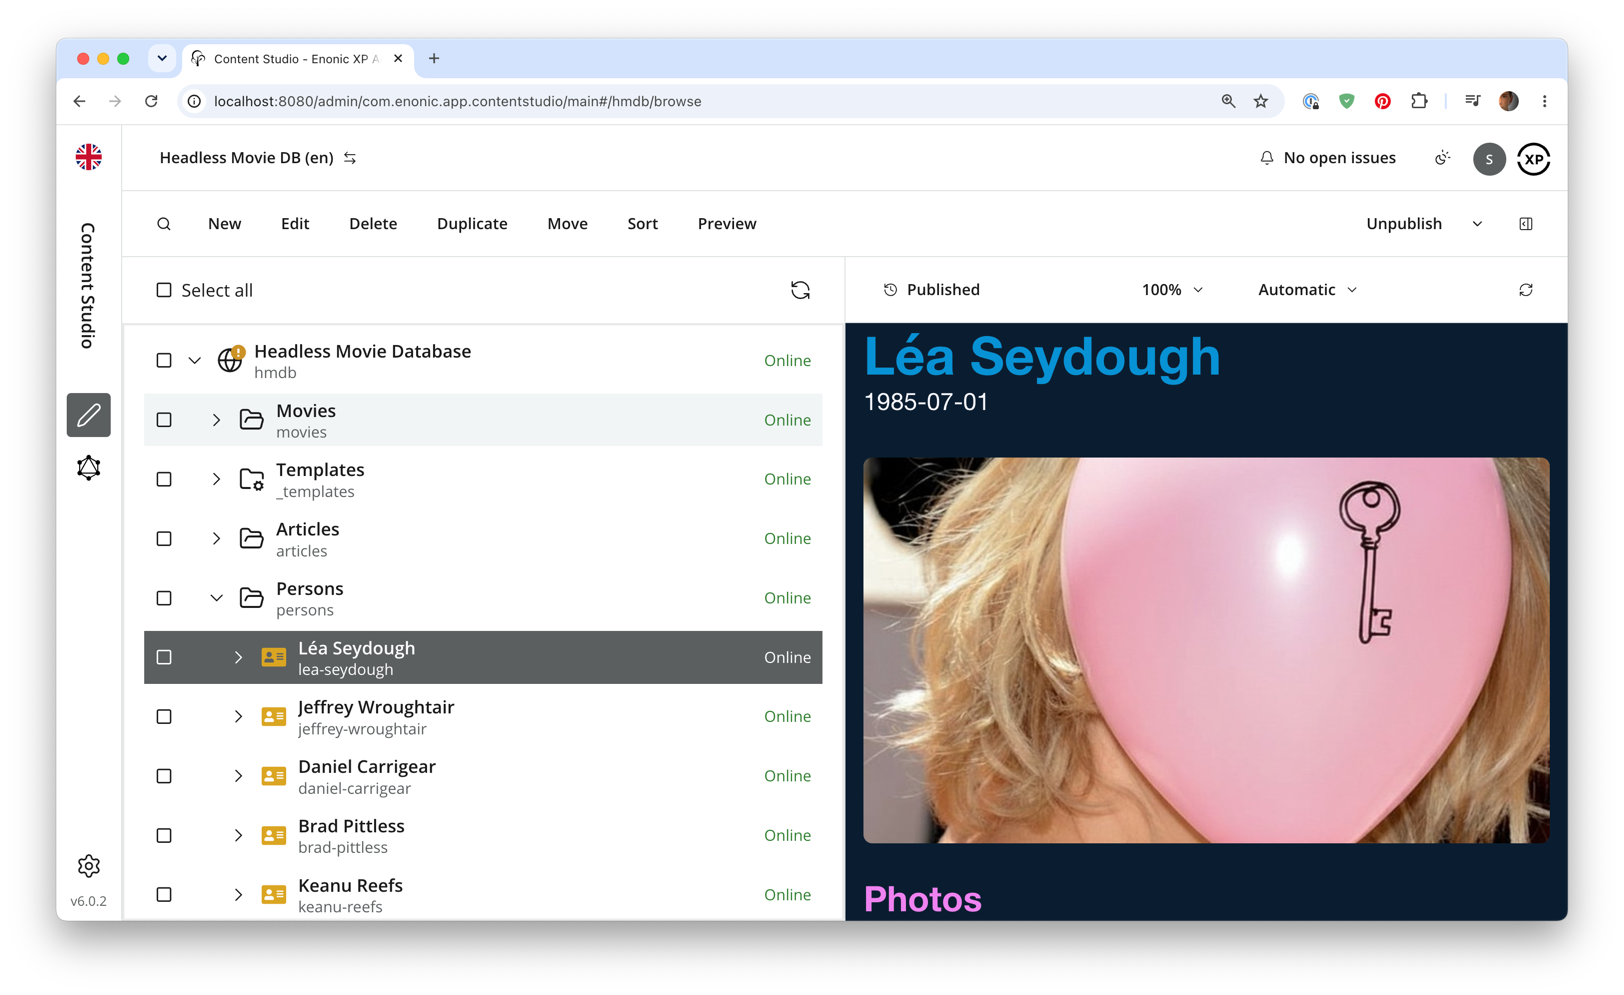
Back in Content Studio, select a person item to see what you have made:
Next
You are on a roll, next - lets have a look at Rich text handling.