Rendering basics
Contents
In this chapter we will look into the basic rendering mechanisms, and add some custom rendering to our app as well.
Dev mode rendering
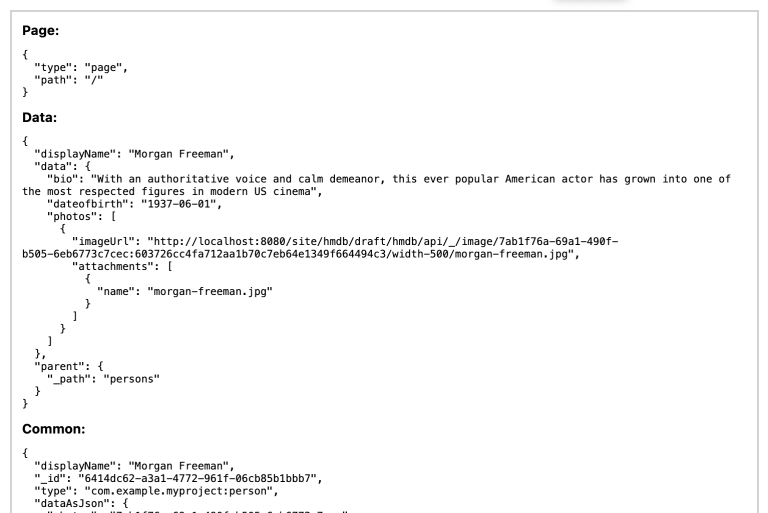
As you have seen during the setup of Next, each content item automatically map to a page listing available props. These props are fetched by the so-called Enonic Adapter.
By defining custom queries and react components tailored for each content type, we can customise the props passed to the view, and which React template is actually applied.
Task: Get person content
Let’s build our first component - starting with rendring of "person" content types:
The full name of your content type should now be com.example.myproject:person If you used a different name when creating the Enonic app, update the .env file in your Next.js app to reflect this. |
-
Add query by creating the following file in your front-end application
src/components/queries/getPerson.tsimport {APP_NAME_UNDERSCORED} from '@enonic/nextjs-adapter'; const getPerson = ` query($path:ID!){ guillotine { get(key:$path) { displayName ... on ${APP_NAME_UNDERSCORED}_Person { data { bio dateofbirth photos { ... on media_Image { imageUrl: imageUrl(type: absolute, scale: "width(500)") attachments { name } } } } } parent { _path(type: siteRelative) } } } }`; export default getPerson;This file defines a graphQL query 'getPerson' that will fetch data from the Enonic API.
You may validate the query by copying it to the GraphQL playground. Replace APP_NAME_UNDERSCOREDwithcom_example_myprojectand set a query variable, try this for instance:{"path": "/hmdb/persons/brad-pitt"}` -
Add the following imports to component mappings file:
src/components/_mappings.tsimport getPerson from './queries/getPerson'; import {APP_NAME} from '@enonic/nextjs-adapter'; -
Then Register the query in the same file:
src/components/_mappings.ts// Content type mappings ComponentRegistry.addContentType(`${APP_NAME}:person`, { query: getPerson, view: PropsView }); -
Check the result
By visiting a person item - like
http://localhost:3000/persons/morgan-freemanyou should now see data props being listed in the view.
Task: Add person template
With fresh content available, it’s time to make things shine:
-
Add view by creating the following file in your Next.js application
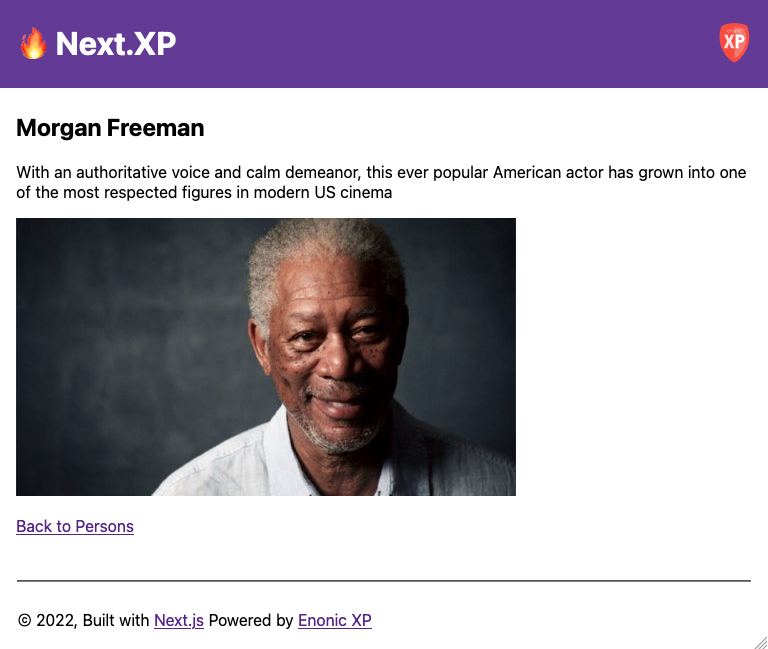
src/components/views/Person.tsximport React from 'react' import {FetchContentResult, getUrl} from '@enonic/nextjs-adapter'; const Person = (props: FetchContentResult) => { const {displayName, data, parent} = props.data?.get as any; const {bio, photos} = data; const meta = props.meta; const {_path} = parent; return ( <> <div> <h2>{displayName}</h2> <p>{bio}</p> { photos.map((photo: any, i: number) => ( <img key={i} src={getUrl(photo.imageUrl, meta)} title={getTitle(photo, displayName)} alt={getTitle(photo, displayName)} width="500" /> )) } </div> <p><a href={getUrl(_path, meta)}>Back to Persons</a></p> </> ) } export default Person; function getTitle(photo: any, displayName: string) { return (photo.attachments || [])[0].name || displayName; }This file defines a react view
Personthat will use the props from the query to render the person. -
Register Person view by adding the following import to the component mappings:
src/components/_mappings.tsimport Person from './views/Person';And then update the component mapping you created earlier to use the new view:
src/components/_mappings.ts// Content type mappings ComponentRegistry.addContentType(`${APP_NAME}:person`, { query: getPerson, view: Person }); -
Check the result - The page should automatically reload once the changes have been saved

The content type mapping applies to every person content item in the site, regardless of it’s location in the hierarchy. Try looking at some other persons, eg. http://localhost:3000/persons/uma-thurman
Task: Add custom header and footer
Adding some styles, a header and a footer will make the site more interesting visually. Next.js provides a handy solution to this problem.
The _app.tsx file initializes the React pipeline, and by modifying it we can inject the same header and footer components to all pages generated by Next.
Sample header and footer views are already included in the starter under /src/components/views, so all we need to do is put them to work. |
Update src/pages/_app.tsx` with the following changes:
-
Add these imports
import Header from '../components/views/Header'; import Footer from '../components/views/Footer'; import {getUrl} from '@enonic/nextjs-adapter'; -
And at the bottom of the file replace the entire return function:
return (
    <StaticContent condition={isEdit}>
        <Component {...pageProps} />
    </StaticContent>
);
with this:
return (
    <StaticContent condition={isEdit}>
        <Header
            title="🔥 Next.XP"
            logoUrl={getUrl('/images/xp-shield.svg', pageProps.meta)}
            meta={pageProps.meta}
        />
            <main style={{
                margin: `0 auto`,
                maxWidth: 960,
                padding: `0 1rem`,
            }}>
                <Component {...pageProps} />
            </main>
        <Footer/>
    </StaticContent>
);
Pay attention to the getUrl() function. It ensures that links to assets and pages are working seamlessly in Next.js, as well as in Content Studio preview mode - as you will see later. |
Morgan Freeman’s page should now look like this

The common query
You may have noticed the Common props appearing in the various prop views - these originate from the the following statement in the mappings:
...

// Common query
ComponentRegistry.setCommonQuery([commonQuery, commonVariables]);

...
The result of this query is available across all components on the page, and may be useful if you want to fetch data for the page itself, or to be used across multiple components. Feel free to adapt it to your requirements.
| If you do not need any common props, remove it from the mappings to optimize performance. |
With the basic rendering completed, in the following chapter, you’ll add preview support to Content Studio.