Next.XP - Next.JS sites powered by Enonic XP
Contents
Intro
This tutorial is a step-by-step introduction to building Next.js sites, using Enonic XP as your CMS and back-end.
The tree structure and content in the CMS is used to directly manage the URLs and pages in the front-end.
You will complete the following steps:
Set up the Enonic SDK and demo content
Get familiar with the headless API
Create a Next.js app using a template
Activate live preview in Enonic
Render content based on type
Build landing pages using components
Create page templates
Deploy to live servers
How does it work?
Static rendering
The integrations defaults to using Next.js’s Incremental Static Rendering (ISR) for extremely fast websites, but also supports the more traditional (and flexible) Server Side Rendered (SSR) approach.
The Enonic Adapter
The "Enonic adapter" extends Next.js by giving developers an intuitive way of working with and rendering editorially managed components and pages from Enonic XP.
Preview and publishing
A Next.js extension for Content Studio seamlessly activates Next.js’s preview mode, giving editors a familiar and instant visual editing experience. Also, when publishing, the extension will automatically clear cache and trigger new rendering in the front-end.
TL;DR
Impatient? Skip to the end of the tutorial and get a live demo by following these instructions: |
To learn what is really happening, head on to the first chapter instead.
1. Setup Enonic
Sign up to Enonic Cloud: https://enonic.com/sign-up/cloud-trial
Create a new solution based on the
Next.js demo
templateFrom
solution/environments
: Notice the links to the "API" route, you will need it later.Visiting the API link will give you a 404 page, because the GraphQL APIs are located on /draft and /master respectively, and communicate via HTTP POST
requests rather thanGET
.
2. Create Git repo
The front-end hosting service requires access to a Git repo where your account has write access.
Clone or fork https://github.com/enonic/nextjs-enonic-demo/ to a Github/Bitbucket/Gitlab account you have access to
If you are using Github, simply press the Fork
button at the top right.Notice the URL to your new Git repository, you will need it in the Next step (pun intended).
3. Deploy Next app
Vercel are the makers of Next.js, and you’ll be using their service to host the front-end.
Sign up to Vercel: https://vercel.com/
Create a new project
enonic-demo-drafts
, and connect it to the repo you created in step 2.Add environment variables telling the app where it will find the draft and live API, as well as token you will need to access preview mode in a later step.
- KEY:VALUE
-
CONTENT_API_DRAFT:<API URL>/draft
- KEY:VALUE
-
CONTENT_API_MASTER:<API URL>/master
- KEY:VALUE
-
API_TOKEN:<yoursecretstring>
After deploying, your Vercel app should now render the front page:
Check the Vercel function logs if you are not getting the expected result.
4. Enable preview
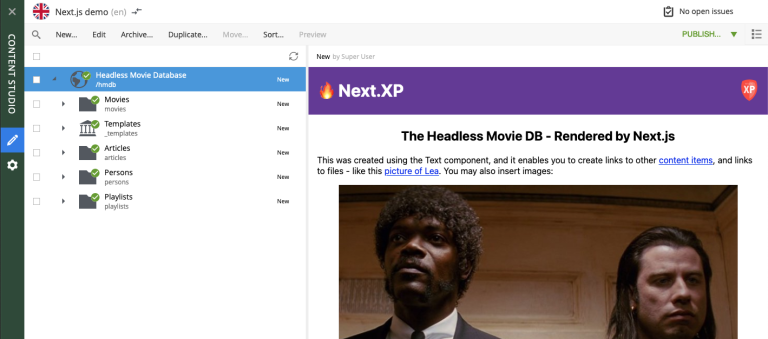
With the front-end running, it is time to activate preview in Content Studio.
From the Enonic Cloud, Launch the Enonic XP admin, and open Content Studio
Select the root item
Headless Movie Database
and click edit.Configure the application called "Next.js demo" by clicking the pencil icon.
- NextJS server URL
-
<URL to your vercel app>
- NextJS API token
-
<secret you added to Vercel in step 3>
After applying and saving the changes, you should instantly see the live preview in Content Studio.
How does this work? Content Studio uses the token to activates Next.js' preview mode automatically. Changes made in content studio will only be visible here until published. Upon publishing, CS will force Next.js to revalidate the pages and changes will be live as soon as next has rendered the items. |
Congratulations, you now have a Next.js site powered by Enonic! 🚀