Macros - Custom rich text components
Contents
In this chapter you’ll learn how to render Macros, which are custom components within rich text.
Intro
Occationaly, you may require rich components, even within your rich text. This is enabled via a component type called Macros. Macros follow the same pattern as we have seen for other components
FactBox macro
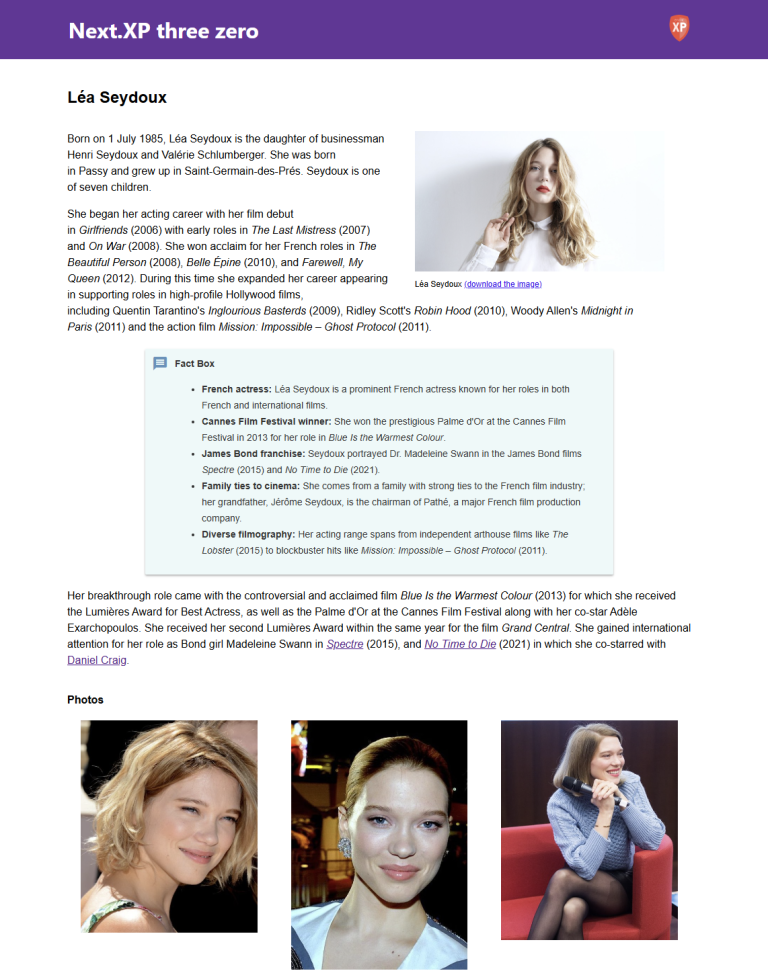
In your Enonic project, a FactBox macro schema is pre-defined. It is located in src/main/resources/site/macros/FactBox.xml If you take a closer look at the Léa Seydoux bio, you can see how the [factbox] macro is used.
Task: Factbox component
Let’s create a React component that will render the factbox macro.
-
Create the FactBox component
This React component will automatically be invoked by the
RichTextViewused in the previous chapter, should it encounter a corresponding macro in the text.src/components/macros/FactBox.tsximport type {MacroProps} from '@enonic/nextjs-adapter'; import React from 'react' import styles from './FactBox.module.css'; const FactBox = ({name, children, config, meta}: MacroProps) => { // macro is used inside a <p> tag so we can't use any dom tags const header = config.header.length ? config.header : 'Fact Box'; return <> <ins className={styles.factbox}> <i className={styles.icon}>💬</i> <strong className={styles.header}> {header}</strong> {children} </ins> </> }; export default FactBox;Style it by adding a CSS module as well:
src/components/macros/FactBox.module.css.factbox { background-color: rgb(235, 249, 249); display: block; text-decoration: none; -webkit-border-radius: 2px; -moz-border-radius: 2px; border-radius: 2px; clear: both; -webkit-box-shadow: 0 2px 3px rgba(0, 0, 0, .3); -moz-box-shadow: 0 2px 3px rgba(0, 0, 0, .3); box-shadow: 0 2px 3px rgba(0, 0, 0, .3); min-height: 24px; line-height: 24px; font-family: sans-serif; font-size: 14px; color: #333; padding: 10px 20px 10px 44px; width: 75%; margin: 20px auto; position: relative; } .factbox .header { font-size: 14px; font-weight: bold; line-height: 24px; margin: 0; } .factbox .icon { position: absolute; font-size: 24px; top: 10px; left: 10px; font-style: normal; } .factbox .body ul { padding-left: 0; } .factbox .body ul li { margin: 5px 0; } @media screen and (max-width: 720px) { .factbox { width: 90%; } } -
Register the factbox macro, just like all other components
src/components/_mappings.ts... import FactBox from './macros/FactBox'; ... ComponentRegistry.addMacro(`${APP_NAME}:factbox`, { view: FactBox, configQuery: '{ header }' });Macros do not support the regular queries, but you may use configQuery. This specifically operates on the form values for the component, and the result will automatically be available in the React component’sconfigprop.You do not need to ask for the macro body, as this implicitly passed to the Macro component. Macros must be registered before any other component that uses RichTextView! Best practice is to register it at the top of the _mappings.tsfile. -
Sweet!
You should now see Lea Seydoux updated with the
FactBoxmacro:

In the next chapter we’ll make it possible to create landing pages editorially.