Setting up the developer environment
Contents
Set up the developer environment, create, build, and deploy an application.
Install Enonic CLI
The Enonic CLI (Command Line Interface) is an essential tool for developing with Enonic.
If you have npm on your device, run this command:
npm install -g @enonic/cli
If not, here are some alternative ways to install Enonic CLI
To verify that the CLI has been installed, run enonic -v. This should output the version of your installed CLI. To see all available options, simply run enonic.
To upgrade, use enonic latest. If there are new versions, you will see instructions on how to upgrade. |
Create a sandbox
A sandbox is a local developer instance of our platform, Enonic XP. Each sandbox is isolated from the other ones and can run different versions of the platform.
Create a sandbox called mfstutorial by running this command in your terminal:
enonic sandbox create mfstutorial -t essentials -f
This will create a sandbox called mfstutorial using the latest version of Enonic XP, automatically install the essential apps, and then start the sandbox.
To start the sandbox manually: enonic sandbox start mfstutorial |
Create the app
From a new terminal window, run the following command to create the application.
enonic project create my.first.site -d mfs -r tutorial-myfirstsite -s mfstutorial -f
This command creates an app named my.first.site in the folder mfs/. It uses the My first site Github repo as a starter (template), and then links the app to the mfstutorial sandbox.
Project structure
The project folder created should now contain a basic app structure, looking something like this:
build.gradle (1)
build/ (2)
code-samples/ (3)
docs/ (4)
tsup/ (5)
src/
  main/
    resources/
      import/ (6)
      assets/ (7)
      site/
        content-types/ (8)
          country/
          city/
        parts/ (9)
pages/ (10)| 1 | Core build files |
| 2 | Contains output files produced by the build |
| 3 | Code samples that will be used in this tutorial |
| 4 | Contains the documentation you are reading now |
| 5 | TSUP typescript compilation build files |
| 6 | Contains sample content that is imported when the app starts |
| 7 | Location for static assets |
| 8 | Two pre-defined content types, country and city |
| 9 | Part components - leaf components to place on pages |
| 10 | Page components - root component for pages |
Start building
Assuming you did not change any of the values when creating the app, run the following commands:
cd mfs
enonic dev
This will build and deploy the application to your sandbox. Until you abort, the build system will continuously scan for changes in your TypeScript code and compile them.
|
Look for a line like this in the sandbox log to verify that the app has started: 2025-04-09 12:00:53,280 INFO my.first.site - (/main.js) Project "myfirstsite" successfully created 2025-04-09 12:00:53,280 INFO my.first.site - (/main.js) Importing "myfirstsite" data |
Because the sandbox is running in --dev mode, any changes to the code within your app will instantly be picked up. There is no need for manual deployments.
XP Admin
Let’s have a look at the Sandbox’s web interface. Open http://localhost:8080 in your browser (or just click the link).
You should now see the XP boot page:
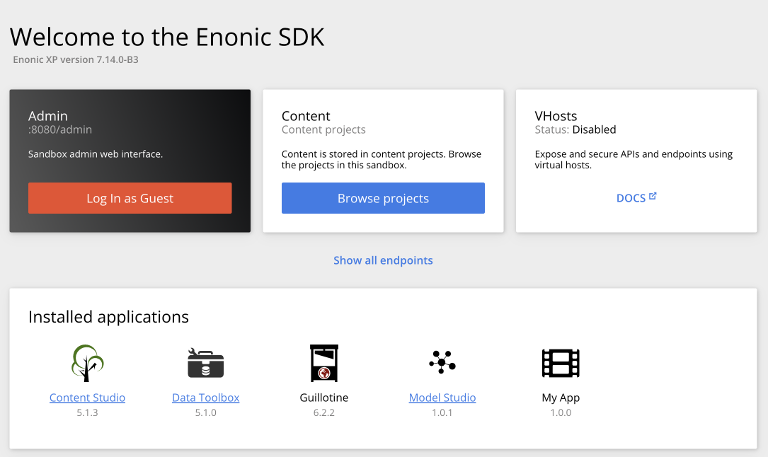
The boot page provides an overview of the sandbox, including installed applications, as well as the standard configuration files.
My first site should be in the list, together with other applications that were automatically installed when you created the sandbox. |
Click btn:[Log In as Guest] to open the XP admin dashboard. You should now see something like this:

You are now on the admin dashboard. The right-hand menu (aka XP menu) enables navigation between admin tools. Admin tools may be injected as extensions via applications.
| If things don’t look exactly the same, don’t worry. In every new version of XP, the background picture gets updated. Also, the admin dashboard is automatically localized based on your browser’s preferred language. |
Summary
You have installed the Enonic CLI, created your first sandbox using the latest XP version, based on a starter, and built and deployed an app to that sandbox.
That’s a good start!
Next, let’s have a look at Content Studio and the sample content.