Deployment and next steps
Contents
In this final chapter, we’ll look into how you can deploy your application for real-life usage. There are essentially two options - Enonic Cloud, and everything else.
Deploy to Enonic Cloud
Enonic Cloud is Enonic’s fully managed and hassle free hosting option. Sit back, relax and let Enonic take care of your infrastructure, monitoring, backups, etc.
Enough with the sales pitch. Follow the steps below to get deploy your app on Enonic Cloud:
Task: Install application
-
Sign up by visiting https://cloud.enonic.com (no credit card needed)
-
After accessing your account for the first time, make sure to choose the
free trialplan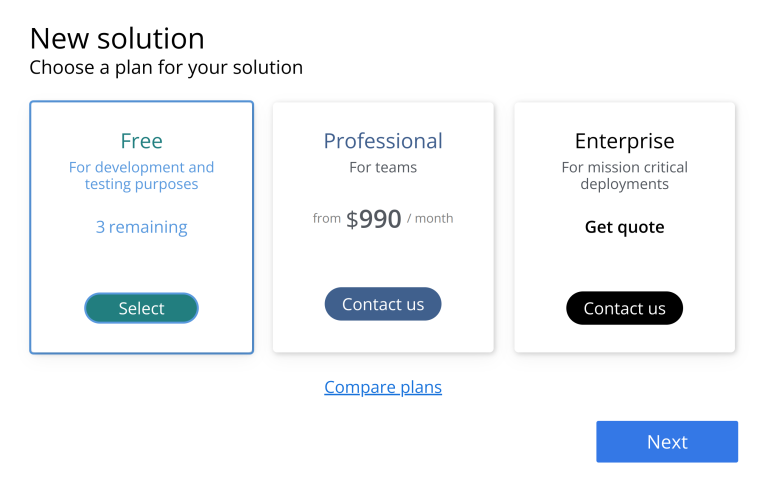 Figure 1. Enonic Cloud plans
 -
Create a new solution. Choose the
CMS essentialstemplate, and go with the default values -
Connect CLI to the cloud by running this command, and follow the instructions:
enonic cloud login -
From your project folder, install the app by running this command:
enonic cloud app install -
From the Cloud console, verify that the app was installed to your selected environment.
-
In the end, you should get something like this in your terminal:
bre@bre-enonic:~/tutorial/myproject$ enonic cloud login

  Your login code is <code>

  Waiting for you to login .Go to this url to login: https://enonic.eu.auth0.com/activate?user_code=<code>

  Waiting for you to login ... success!

  Session expires at: 2023-08-31 02:18:37 +0200 CEST

bre@bre-enonic:~/tutorial/myproject$ enonic cloud app install

  ? Deploy '/home/bre/tutorial/myproject/build/libs/myproject.jar' to 'bre1/guide101/production/xp7'. Is this correct? Yes

  Uploading jar [=======================================================================================] 100.00% 4s

  Deploying jar to service 'bre1/guide101/production/xp7'

  Success!
To make sure it all worked, click on the red "launch" button on your Cloud console Dashboard, then access the "Applications" app, and check if your app is listed on the installed applications list.
Task: Import and publish your content
Since the cloud instance is a completely new environment, the content you created locally will not be available here.
You can choose to:
-
manually create new content on the server, or
-
export and import content from your local machine to the server.
Lets try the second option, i.e, to export data locally and import on enonic cloud:
| Before proceeding, access Content Studio on your cloud instance and make sure to create a project there assigning your app to it. This is needed because the cloud instance is a new empty environment. |
-
Access the Data toolbox app and go to "Data tree";
-
Navigate to
com.enonic.cms.myfirstproject>draft>[root], then selectcontentand click on "Export selected node"; -
You’ll be redirected to the "Node exports" page. Now click on the export item and then on the top right icon that says "Archive and download selected node exports". This will download a zip file locally;
-
Go back to your cloud instance, access Data toolbox "Node exports" page, click on "Upload and unarchive node exports" and then select the zip file downloaded on the previous step;
-
Vist "Data tree" page on Data toolbox and navigate to
com.enonic.cms.<name-of-your-cloud-project>>draft>[root], click on "Import node export" and select the one that was created on the previous step; -
Now access Content Studio and check that your data is imported as it should. Make sure to publish everything to make it available on master branch.
With the app installed, and fresh content available - we are ready for the final step.
Task: Go live
To make your content accessible publicly, the final step is to create a Route. Follow these steps to complete the task:
-
From the Cloud console, go to
Routesand click create. Choose the following options:-
Choose target environment (if there are more than one)
-
Accept the default domain
-
Use the internal path
/site/<name-of-your-cloud-project>/master -
The public path could for instance be
/api
-
-
Congratulations, your API is now live and your content on master branch can be fetched at the
/apiroute: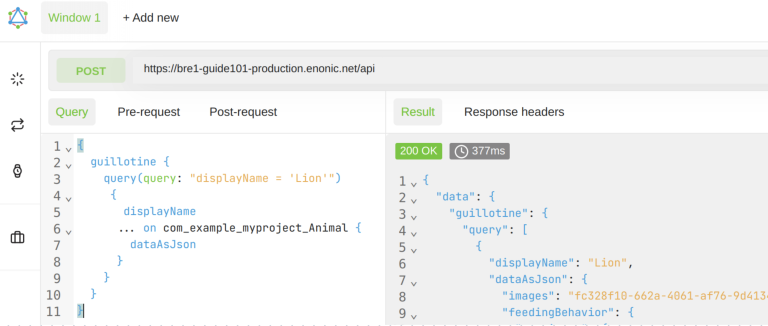 Figure 2. Querying Lion data on /api route using Altair GraphQL client
| For more information on Enonic Cloud, visit the Enonic Cloud marketing page. |
Custom hosting
If Enonic Cloud isn’t your thing, you need to start by getting the platform (Enonic XP) up and running, before you can actually deploy your application.
Enonic XP is compatibile with just about any public cloud out there. There’s a number of different deployment strategies and subscription options to choose from, based on what suits your particular situation best.
Setting up the entire platform is beyond the scope of this tutorial. As such, we’ll focus on the steps required for getting your app live - assuming you already have the platform running.
For more details on deplying the platform, check out the Deployment section of the XP reference docs.
Installing the app
Regardless of how you deploy your XP instance, installing your app is commonly done in one of two ways:
First alternative is via Admin console. Follow these simple steps:
Your application executable (*.jar file) can be found in project-folder/build/libs/ |
-
Log into the XP admin console (user must have Administrator priveliges)
-
From the XP menu, open the Applications tool.
-
Choose install from the toolbar, and upload your application
.jarfile. You can drag and drop your application or navigate the file hierarchy via the upload button.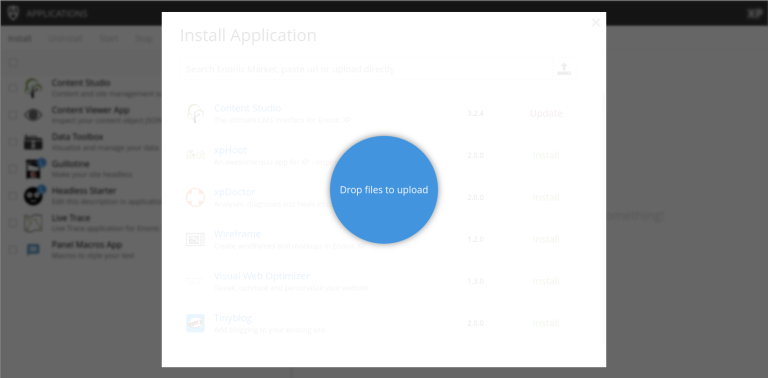 Figure 3. Drag and drop applications to upload them
Second alternative is via API:
If you have access to your server’s management API (available on port 4848), you can also deploy directly via this endpoint, or by using the CLI.
This approach is most commonly used in a Continuous Integration/Delivery setup, where your build server automatically checks out, builds and installs the application.
Virtual hosts = pretty URLs
When accessing XP resources such as the GraphQL API explorer in this tutorial, the URLs have been long and unsightly. In a production setting you want short, pretty URLs that are easy to remember. Virtual host (vhosts) configuration lets you do just that.
Setting up a vhost is only required once per application/site you want deploy.
Vhosts can be defined in your sandbox’s configuration directory. This file contains mappings from public-facing URLs to internal URLs.
For instance, this lets the user access myapp.com/api and while retrieving content from /site/myapp/master/.
An example vhosts file that achieves the mapping mentioned would look something like this:
enabled = true (1)

mapping.example.host = myapp.com/api (2)
mapping.example.source = / (3)
mapping.example.target = /site/myapp/master (4)
| 1 | Enable vhosts configuration |
| 2 | For all requests to my-first-site.com/api |
| 3 | Map any request that starts with this path … |
| 4 | … to the internal URL. |
For more details on virtual hosts, head to the Vhosts section of the deployment documentation.
Task: Setup vhosts in your Sandbox
To explore how vhost mappings work, let’s configure vhosts for your local XP instance, then, to test it, we’ll have override your computer’s DNS resolver by updating it’s hosts file.
-
Find and open your sandbox’s vhosts file. From your user’s home directory, the path will be
.enonic/sandboxes/<sandbox-name>/home/config/com.enonic.xp.web.vhost.cfg, where<sandbox-name>varies depending on which sandbox you want to configure. For instance, it might beSandbox1. -
Update the vhosts file.
enabled = true

mapping.admin.host = xp-admin.com (1)
mapping.admin.source = /
mapping.admin.target = /admin
mapping.admin.idProvider.system = default

mapping.localhost.host = localhost (2)
mapping.localhost.source = /
mapping.localhost.target = /
mapping.localhost.idProvider.system = default
1 If requests go to xp-admin.com:8080, send them to:8080/admin2 This block allows the localhost mappings to keep working. Without this, localhost:8080wouldn’t work anymore. -
If you’re watching your XP process, you should see a message like this:
2021-06-09 13:49:43,405 INFO  c.e.x.s.i.config.ConfigInstallerImpl - Loaded config for [com.enonic.xp.web.vhost]
2021-06-09 13:49:43,411 INFO  c.e.x.w.v.i.c.VirtualHostServiceImpl - Virtual host is enabled and mappings updated.
This means that XP has updated the mappings and is ready to go.
-
To test this out, update your local hosts file (hosts file on Wikipedia) to point
xp-admin.comto127.0.0.1by adding the following line to the file:127.0.0.1 xp-admin.comOn Linux and macOS you’ll find the hosts file at /etc/hosts. On Windows, it’s located atc:\Windows\System32\Drivers\etc\hosts -
Now access
http://xp-admin.com:8080in your browser. If all has gone well, you should see the familiar XP login screen.
Vhost troubleshooting
If you’re not seeing anything when you direct your browser to http://xp-admin.com:8080 or aren’t able to access the resources, that may be due to a browser setting. Try using a different browser and see if that makes a difference. Alternatively, you can try running
curl -v xp-admin.com:8080/toolsIf the connection is successful, one of the lines in the output should say something to the effect of
* Connected to xp-admin.com (127.0.0.1) port 8080 (#0)
and you should get a massive block of HTML printed to the terminal. This HTML is the content of the login page in raw form.
You might not be able to do much with that output, but it means the mapping has worked successfully, which is the important part for this task.
What’s next?
Congrats! You’ve reached the end of this introduction. If you’d like to go further now, try one of the following guides which introduce additional aspects of the Enonic experience?
- My first site
-
Building a website with the Enonic Framework (no 3rd party framework required). This tutorial also introduces the concept of pages, and building blocks such as regions, parts, and page templates.
- Building sites with Enonic and Next.js
-
Everything you need to start building Next.js-based sites with Enonic as your CMS - including full WYSIWYG editing. This tutorial also introduces the concept of pages, and building blocks such as regions, parts, and page templates.
- My first webapp
-
Build and service webapps directly using the Enonic framework. Focuses on JavaScript controllers, serving assets, and basic routing.