Hello React4XP
Contents
Linking React4XP to your content - and how it works
Movie DB dataset
This tutorial is dedicated to front-end development. To make it as compact as possible, the Headless Movie DB dataset was installed in the setup. This contains several pre-defined content schemas as well as sample content and mock previews. We’ll be using this dataset extensively throughout the tutorial.
To learn about content modeling, visit our getting started guide, or the developer 101 tutorial.
Add app to site
Follow these steps to make your application a front-end for the Headless Movie DB.
-
Visit localhost:8080/admin. Log in and open Content Studio.
-
The "Headless Movie Database" project should automatically be visible
-
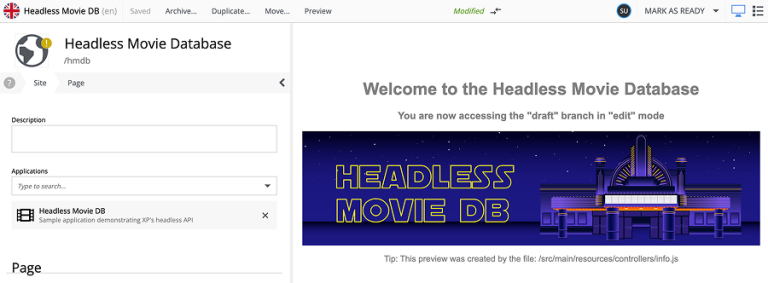
Select the root item in the tree structure, and click Edit. You should see something like this:

-
Add your brand new "React4XP" application to the site. After saving, the preview will refresh, to reveal something like this:

The component was initially rendered on the server, then hydrated to spin up as a client-side React component.
Click Preview and try pressing the button for some React action. |
A look at the code
What just happened?
By adding the application to the site, it is injected into Enonic’s standard rendering - aka the Site Engine. Here, it basically hijacks the rendering - taking presdence over HMDB’s built-in preview.
Let’s have a look at the code:
Hello component
The component that rendered the page is very simple:
import type {ComponentProps} from '@enonic/react-components';
import * as React from 'react';
import styles from './Hello.module.css';

export interface HelloProps
    extends Record<string, unknown> {
    title: string
    initialCount: number
}

export const Hello = (props: ComponentProps) => {
    const {title, initialCount} = props.data as HelloProps;
    const [count, setCount] = React.useState(initialCount);
    return (
        <section className={`helloPage ${styles.helloContainer}`}>
            <h1>{title}</h1>
            <button onClick={() => setCount(count + 1)}>{count} Clicks!</button>
        </section>
    );
};
It takes a single parameter, HelloProps. The type is declared like this:
export interface HelloProps extends Record<string, unknown>{
    title: string
    initialCount: number
}| Typing your props is optional, but recommended for more robust code. |
Data Processor
A data processor is used to fetch the props:
import {PageDescriptor} from '@enonic-types/core';
import type {ComponentProcessor} from '@enonic-types/lib-react4xp/DataFetcher';

export const helloProcessor: ComponentProcessor<PageDescriptor> = (params) => {
    const title = params.content?.displayName || params.content._name || 'Display name not set';
    return {
        title: title,
        initialCount: 0,
    };
};
This processor does not execute by itself, it must be registered in the dataFetcher.
| The dataFetcher solely executes on the server side. |
The dataFetcher will only invoke a processor if needed, in our case when a content of type portal:site (the site content) is rendered.
import {DataFetcher} from '/lib/enonic/react4xp';
import {helloProcessor} from './components/HelloProcessor';

export const dataFetcher = new DataFetcher();

dataFetcher.addContentType('portal:site', { processor: helloProcessor }); (1)| 1 | helloProcessor is mapped to the content type portal:site, which means it will be executed whenever the URL matches a site content. |
Component Registry
Back to the Hello React component. Similar to the dataFetcher, this must be added to the ComponentRegistry in order to work.
import {ComponentRegistry} from '@enonic/react-components';
import {Hello} from './components/Hello';

export const componentRegistry = new ComponentRegistry();

componentRegistry.addContentType('portal:site', { View: Hello }); (1)| 1 | The Hello component is mapped to the content type portal:site, which means it will be executed whenever the URL matches a site content. |
Try clicking other content items in Content Studio, and you should simply see an error message at this point.
| Dive deeper by learning how the basic boot-strapping and routing works in the app controller documentation. |
Next up
Great, you rendered your first page, let’s check out common processors and components.