Parts
Contents
Intro
Parts are highly flexible components which may be used to enrich your pages. Each part is like a content type, with an optional form that can be used to create content.
Child list component
Take a look at the Person folder. You may see something like this: 
-
Add the
child-listcomponent to your front-end:/src/main/resources/react4xp/components/parts/ChildList.tsximport type {ComponentProps} from '@enonic/react-components'; import React from "react"; import styles from "./ChildList.module.css"; export const ChildList = (props: ComponentProps) => { const {names, paths} = props.data as any; if (!names?.length) { return <ul className={styles.list}> <li className={styles.listItem}> <p className={styles.listLink}>No child elements found.</p> </li> </ul>; } return <ul className={styles.list}> {names.map((name, index) => ( <li className={styles.listItem} key={index}> <a className={styles.listLink} href={paths[index]}><p>{name}</p></a> </li> ))} </ul> };/src/main/resources/react4xp/components/parts/ChildListProcessor.tsimport type {ComponentProcessor} from '@enonic-types/lib-react4xp/DataFetcher'; import {getChildren} from '/lib/xp/content'; import {PartComponent} from '@enonic-types/core'; export const childListProcessor: ComponentProcessor<'com.enonic.app.hmdb:child-list'> = (params) => { const component = params.component as PartComponent; const sortOrder: any = component.config.sorting; const result = getChildren({ key: params.content._id, start: 0, count: 99, sort: sortOrder }); return { names: result.hits.map((content) => content.displayName), paths: result.hits.map((content) => params.request.path + '/' + content._name), }; };/src/main/resources/react4xp/components/parts/ChildList.module.css.list { list-style: none; padding-left: 0; } .listItem { margin-block: .25rem; } .listLink { color: #61DBFB; text-decoration: none; font-weight: 500; } .listItem p { margin-block: 0; } -
Register the component and processor:
/src/main/resources/react4xp/componentRegistry.tsximport {ChildList} from './components/parts/ChildList'; ... export const componentRegistry = new ComponentRegistry(); ... componentRegistry.addPart('com.enonic.app.hmdb:child-list', {View: ChildList});/src/main/resources/react4xp/dataFetcher.tsimport {childListProcessor} from './components/parts/ChildListProcessor'; ... export const dataFetcher = new DataFetcher(); ... dataFetcher.addPart('com.enonic.app.hmdb:child-list', {processor: childListProcessor}); -
Refresh the Persons page to see the result:

Try updating the CMS component by changing the sorting order, or even adding or removing items within the tree structure.
Bonus task: Heading
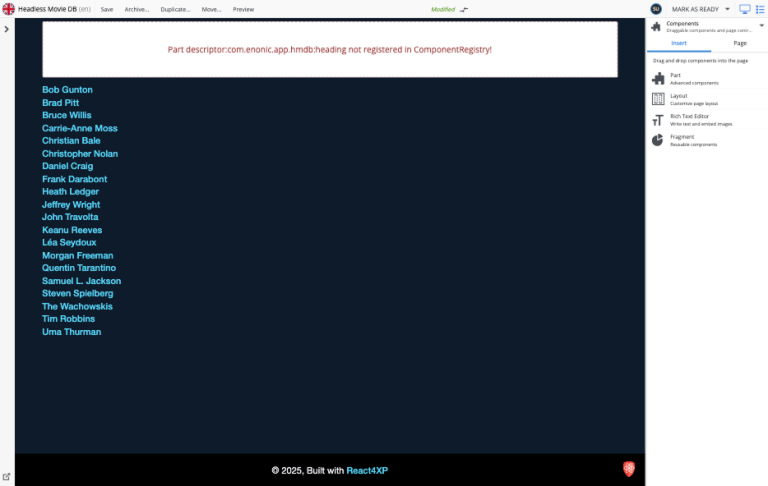
HMDB also contains data for one more part, Heading. Follow the steps below to start rendering the heading as well:
-
Add the
headingcomponent to your application:/src/main/resources/react4xp/components/parts/Heading.tsximport React from 'react'; import type {ComponentProps} from '@enonic/react-components'; export const Heading = ({data}: ComponentProps) => { return <h1>{data.heading as string}</h1> };/src/main/resources/react4xp/components/parts/HeadingProcessor.tsimport {PartComponent} from '@enonic-types/core'; import type {ComponentProcessor} from '@enonic-types/lib-react4xp/DataFetcher'; export const headingProcessor: ComponentProcessor<'com.enonic.app.hmdb:heading'> = (params) => { const component = params.component as PartComponent; const heading = component.config?.heading || params.content.displayName || 'Display name not set'; return { heading: heading, }; };Since we are using globalStyles.css to style the heading, we don’t need to add a CSS module for this component.
-
Add the
headingpart to your component registry and data fetcher:/src/main/resources/react4xp/componentRegistry.tsimport {ChildList} from './components/parts/ChildList'; import {Heading} from './components/parts/Heading'; ... export const componentRegistry = new ComponentRegistry(); ... componentRegistry.addPart('com.enonic.app.hmdb:child-list', {View: ChildList}); componentRegistry.addPart('com.enonic.app.hmdb:heading', {View: Heading});/src/main/resources/react4xp/dataFetcher.tsimport {childListProcessor} from './components/parts/ChildListProcessor'; import {headingProcessor} from './components/parts/HeadingProcessor'; ... export const dataFetcher = new DataFetcher(); ... dataFetcher.addPart('com.enonic.app.hmdb:child-list', {processor: childListProcessor}); dataFetcher.addPart('com.enonic.app.hmdb:heading', {processor: headingProcessor}); -
Now you should be able to see something like this:

Moving on, we take page composition to the next level. Introducing layouts.