Page templates
Contents
Page templates allow editors to control how specific content types are rendered
Movies
In the HMDB dataset, the /hmdb/page-templates/Movie page template already exists. This will automatically be used when attempting to render content of type Movie.
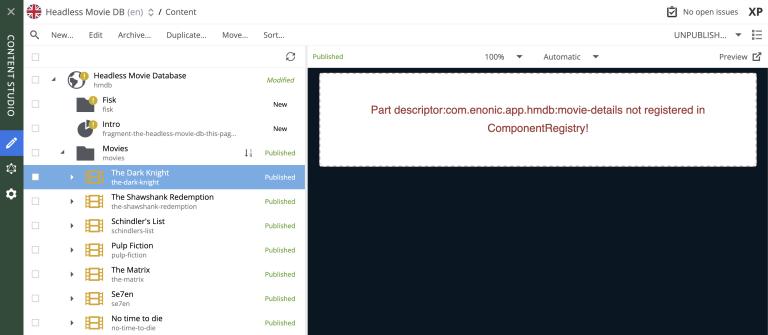
Try selecting a Movie in Content Studio. You should see something like this:

Here, we’re basically missing the implementation of the part that renders the presentation of a movie.
Task: Movie details part
Start by implementing this final component by following the steps below:
-
Add the Movie part files to your app:
/src/main/resources/react4xp/components/parts/Movie.tsximport type {ComponentProps} from '@enonic/react-components'; import React from 'react'; import {REQUEST_MODE} from '../../constants' import styles from './Movie.module.css'; export const Movie = (props: ComponentProps) => { const { restPhotos, trailer, name, photo, website, release, cast, director, subtitle, abstract, meta } = { ...props.data as any, meta: props.meta }; if (!abstract?.length) { if (meta.mode !== REQUEST_MODE.EDIT) { return <h1>Movie details</h1>} return; } return <div className={styles.moviePage}> <header> <h1><a href={trailer} className={styles.sneakyTitle}>{name}</a></h1> </header> <main className={styles.main}> <div className={styles.flexy}> {photo && <section className={styles.firstPhoto}> <a href={trailer}> <img src={photo.imageUrl} alt={photo.title} title={photo.title} className={styles.featuredImage} loading="eager" height={1000} width={700} /> </a> </section>} <div className={styles.blocky}> <div> <div> {website && <> <h2> Official Website </h2> <p className={styles.website}> <a href={website} className={styles.sneakyLink} target="_blank" rel="noopener noreferrer"> {website} </a> </p> </>} {release && <> <h2>Release Date:</h2> <p className={styles.date}>{release}</p> </>} </div> {cast.length > 0 && <section className={styles.cast}> <h2>Cast</h2> <ul> {cast.map((member, index) => ( <li key={index}> <a href={member.castUrl} className={styles.sneakyCastLink}> <img src={member.photoUrl} alt={member.actorName} height={150} width={150} /> <p><strong>{member.actorName}</strong> as {member.character} </p> </a> </li> ))} </ul> </section>} </div> <div> {director && <section className={styles.director}> <h2>Director</h2> <a href={director.url} className={styles.sneakyLink}> <h3>{director.name}</h3> <img className={styles.directorImg} src={director.photo} alt={"Director"} height={200} width={300} /> </a> </section>} </div> </div> </div> <h2>{subtitle}</h2> <section className={styles.abstract}> <p>{abstract}</p> </section> {restPhotos && restPhotos.length > 0 && <section className={styles.photos}> <div className={styles.photoGrid}> <div className={styles.photoScroll}> {restPhotos.map((photo, index) => ( <img key={index} src={photo.imageUrl} alt={photo.title} title={photo.title} className={styles.photoImg} loading="lazy" height={220} width={340} /> ))} </div> </div> </section>} </main> </div> };/src/main/resources/react4xp/components/parts/MovieProcessor.tsimport {get as getContentByKey} from '/lib/xp/content'; import {imageUrl, pageUrl} from '/lib/xp/portal'; import {toArray} from "/react4xp/utils/arrayUtils"; import type {Content} from '@enonic-types/lib-content'; import type {ComponentProcessor} from '@enonic-types/lib-react4xp/DataFetcher'; function fetchAdditionalPhotos(photoIds: string[]) { return photoIds.map(photoId => { if (photoId) { const photoContent = getContentByKey<Content>({key: photoId}); return { _id: photoContent._id, title: photoContent.displayName, imageUrl: imageUrl({id: photoContent._id, scale: 'block(340, 220)'}) // Image scaled for remaining photos }; } }); } export const movieProcessor: ComponentProcessor<'com.enonic.app.hmdb:movie-details'> = (params) => { const data = params.content.data; const photos: string[] = toArray<string>(data.photos as string | string[]); const firstPhotoId = photos[0] || ''; // First photo ID const remainingPhotoIds: string[] = photos.slice(1); // Remaining photo IDs let firstPhoto = null; if (firstPhotoId) { const photoContent = getContentByKey<Content>({key: firstPhotoId}); firstPhoto = { _id: photoContent._id, title: photoContent.displayName, imageUrl: imageUrl({id: photoContent._id, scale: 'block(700, 1000)'}), // Larger scale for first photo id: photoContent._id }; } const restPhotos = fetchAdditionalPhotos(remainingPhotoIds); const cast = toArray<any>(data.cast).map(castMember => { const actorContent = getContentByKey<Content>({key: castMember.actor}); const photos: string[] = toArray<string>(actorContent.data.photos as string | string[]) const firstPhotoId = photos[0] || ''; // Safely access the first ID return { actorName: actorContent.displayName, photoUrl: imageUrl({id: firstPhotoId, scale: 'block(150, 150)'}), character: castMember.character, id: actorContent._id, castUrl: pageUrl({path: actorContent._path}) }; }); let director = null; if (data.director) { const directorId = data.director as string; const result = getContentByKey<Content>({key: directorId}); const directorPhotos: string[] = toArray<string>(result.data.photos as string | string[]) const firstDirectorPhoto = directorPhotos[0]; const directorTitle = result.displayName; const directorUrl = pageUrl({path: result._path}); director = { name: directorTitle, url: directorUrl, photo: imageUrl({id: firstDirectorPhoto, scale: 'block(300, 200)'}) }; } return { name: params.content.displayName, subtitle: data.subtitle, trailer: data.trailer, abstract: data.abstract, release: data.release, photo: firstPhoto, restPhotos, website: data.website, cast, director }; };/src/main/resources/react4xp/components/parts/Movie.module.css.moviePage { line-height: 1.6; margin-inline: auto; } header { text-align: center; margin-bottom: 20px; } .featuredImage { display: block; margin: 0 auto 2.5rem auto; border: solid 1px #61DBFB; box-shadow: 0 0 4px #61DBFB; border-radius: 8px; max-width: 100%; height: auto; } .photoImg { margin-right: 25px; max-width: 100%; border-radius: 8px; margin-block: 5px; } .director a { overflow: visible; margin-top: -1rem; } .directorImg { width: calc(100% - 2px); border: solid 1px #61DBFB; box-shadow: 0 0 4px #61DBFB; border-radius: 8px; } .photos { padding: 1rem 0; background: #000121; position: relative; width: 100vw; display: flex; left: 50%; right: 50%; transform: translateX(-50%); overflow-x: auto; ::-webkit-scrollbar { -webkit-appearance: none; height: 6px; } ::-webkit-scrollbar-thumb { border-radius: 8px; background-color: ghostwhite; } } .photoGrid { max-width: 1400px; margin: 1rem auto 1rem auto; width: 95%; border-radius: 8px; overflow-x: auto; } .photoScroll { display: flex; gap: 25px; white-space: nowrap; } .cast h2 { color: #EF82F0 } .cast ul { list-style: none; padding: 0; } .cast li { display: flex; align-items: center; margin-bottom: 10px; } .cast h3 { color: #EF82F0; } .cast img { width: 75px; height: 75px; margin-right: 10px; border: 1px solid #61DBFB; box-shadow: 0 0 4px #61DBFB; border-radius: 8px; } .cast a { overflow: unset; } .flexy { display: flex; gap: 10px; margin-bottom: 10px; flex-wrap: wrap; width: 100%; justify-content: space-between; } .blocky { display: block; width: 400px; max-width: 100%; margin-top: -.8rem; } .blocky h2 { margin-top: 0; } .sneakyLink { text-decoration: none; display: inline-block; max-width: 100%; text-overflow: ellipsis; overflow: hidden; white-space: nowrap; } .website { margin-top: -1rem; max-width: 100%; } .sneakyLink H3 { margin-inline: 0; margin-top: 0; } .sneakyTitle { text-decoration: none; color: #0892D4; } .sneakyCastLink { text-decoration: none; color: ghostwhite; font-size: 18px; display: flex; } .date { font-size: 24px; margin-top: -1rem; } @media screen and (max-width: 1200px) { .blocky { display: flex; width: 800px; max-width: 90vw; justify-content: space-between; gap: 25px; } } @media screen and (max-width: 550px) { .blocky { display: block; } } -
Then register the component and processor:
/src/main/resources/react4xp/componentRegistry.tsimport {Movie} from './components/parts/Movie'; ... export const componentRegistry = new ComponentRegistry(); ... componentRegistry.addPart('com.enonic.app.hmdb:movie-details', {View: Movie});/src/main/resources/react4xp/dataFetcher.tsimport {movieProcessor} from "./components/parts/MovieProcessor"; ... export const dataFetcher = new DataFetcher(); ... dataFetcher.addPart('com.enonic.app.hmdb:movie-details', {processor: movieProcessor});
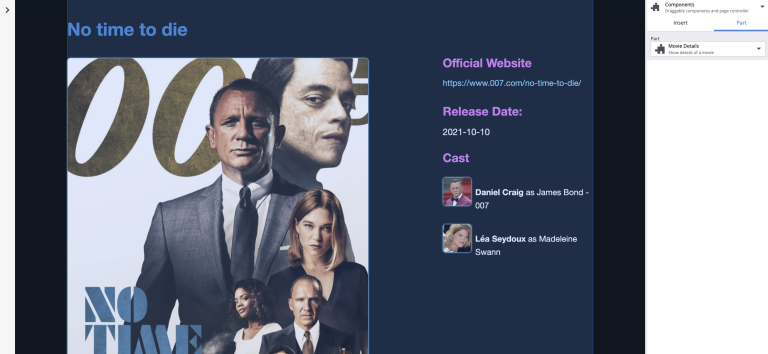
You now have a Part that can render Movies, and it will look something like this:

Optional task: Edit template
The page that is used for rendering movies exists in the "Templates/" folder within your site. Try editing the Movie page template in Content Studio by adding other layouts and parts to see what happens.
Hard-coded content type components, like the Person component we created initially has presedence over editorial page templates. As such, creating a page template for Person will not affect the actual rendering. |
Wrap up
Congratulations on completing the tutorial 🙌.
To dive deeper into the world of React4XP, visit the Appendix section.